Mold on shower caulk is a problem many homeowners encounter. Not only does it look bad, but it can also pose health risks if ignored. Caulk, used to seal gaps in bathrooms, is porous and can trap moisture, making it a perfect spot for mold to grow.
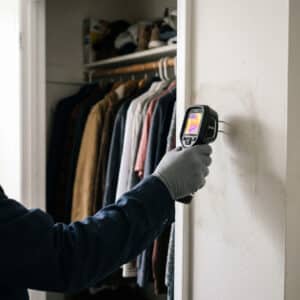
Mold loves warm, damp places, and your shower area offers the ideal conditions. If left untreated, mold can spread to other parts of your bathroom, causing more damage and potential health issues. Taking care of mold on shower caulk quickly is key to keeping your bathroom healthy and looking good. Remember, regular mold testing and taking advantage of a free mold inspection can help you stay ahead of mold issues.
Dangers of Mold on Shower Caulk
Mold is more than just an eyesore; it can have severe consequences for your health and the structural integrity of your home. Prolonged exposure to certain types of mold can lead to respiratory issues, allergic reactions, and even more severe illnesses in individuals with weakened immune systems.
Additionally, mold can cause deterioration of the caulk and surrounding materials, potentially leading to water damage and costly repairs. It’s crucial to address mold growth promptly to prevent further spread and minimize the risks associated with it.
Identifying and Diagnosing Mold on Shower Caulk
The first step in tackling mold on shower caulk is to identify and diagnose the issue correctly. Here are some typical signs to watch for:
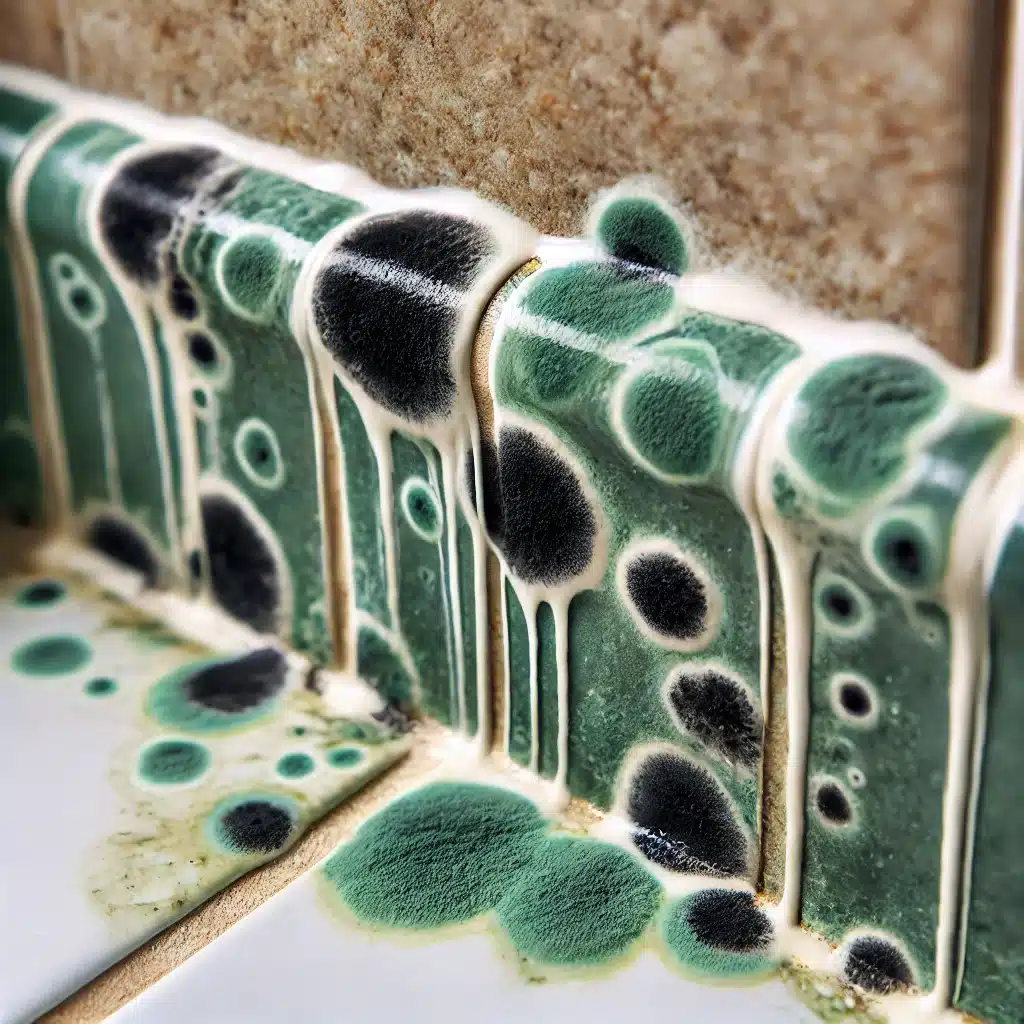
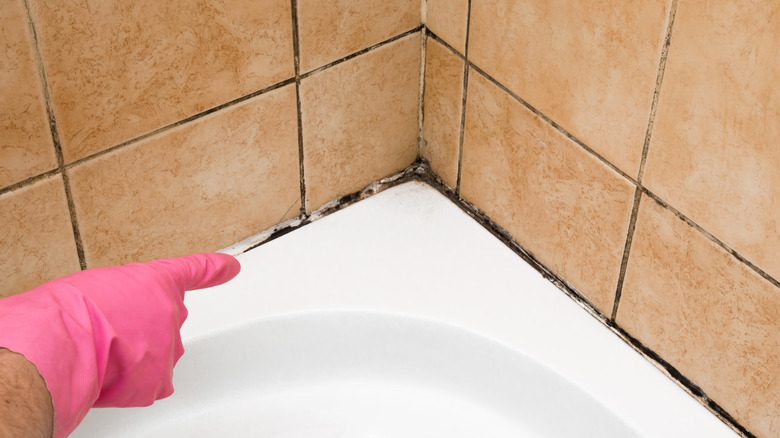
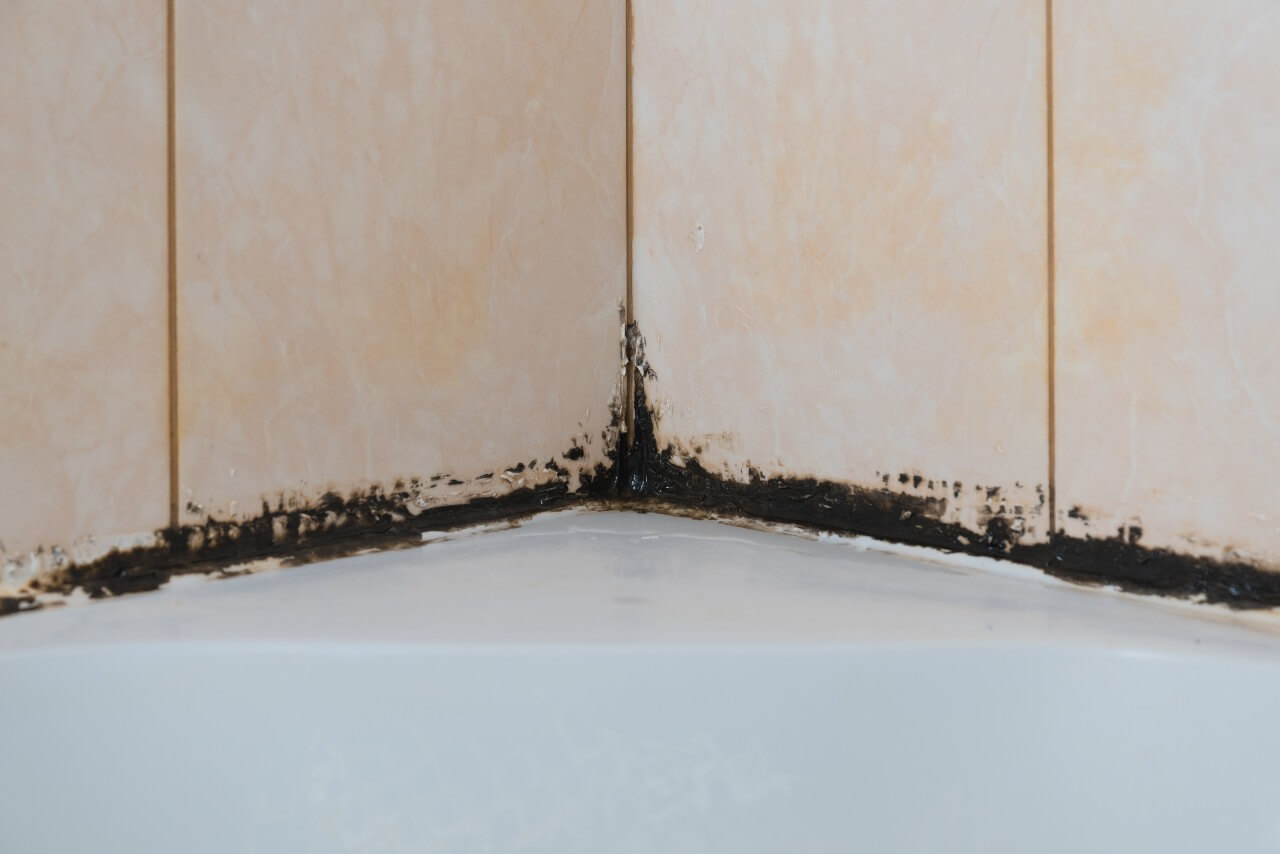
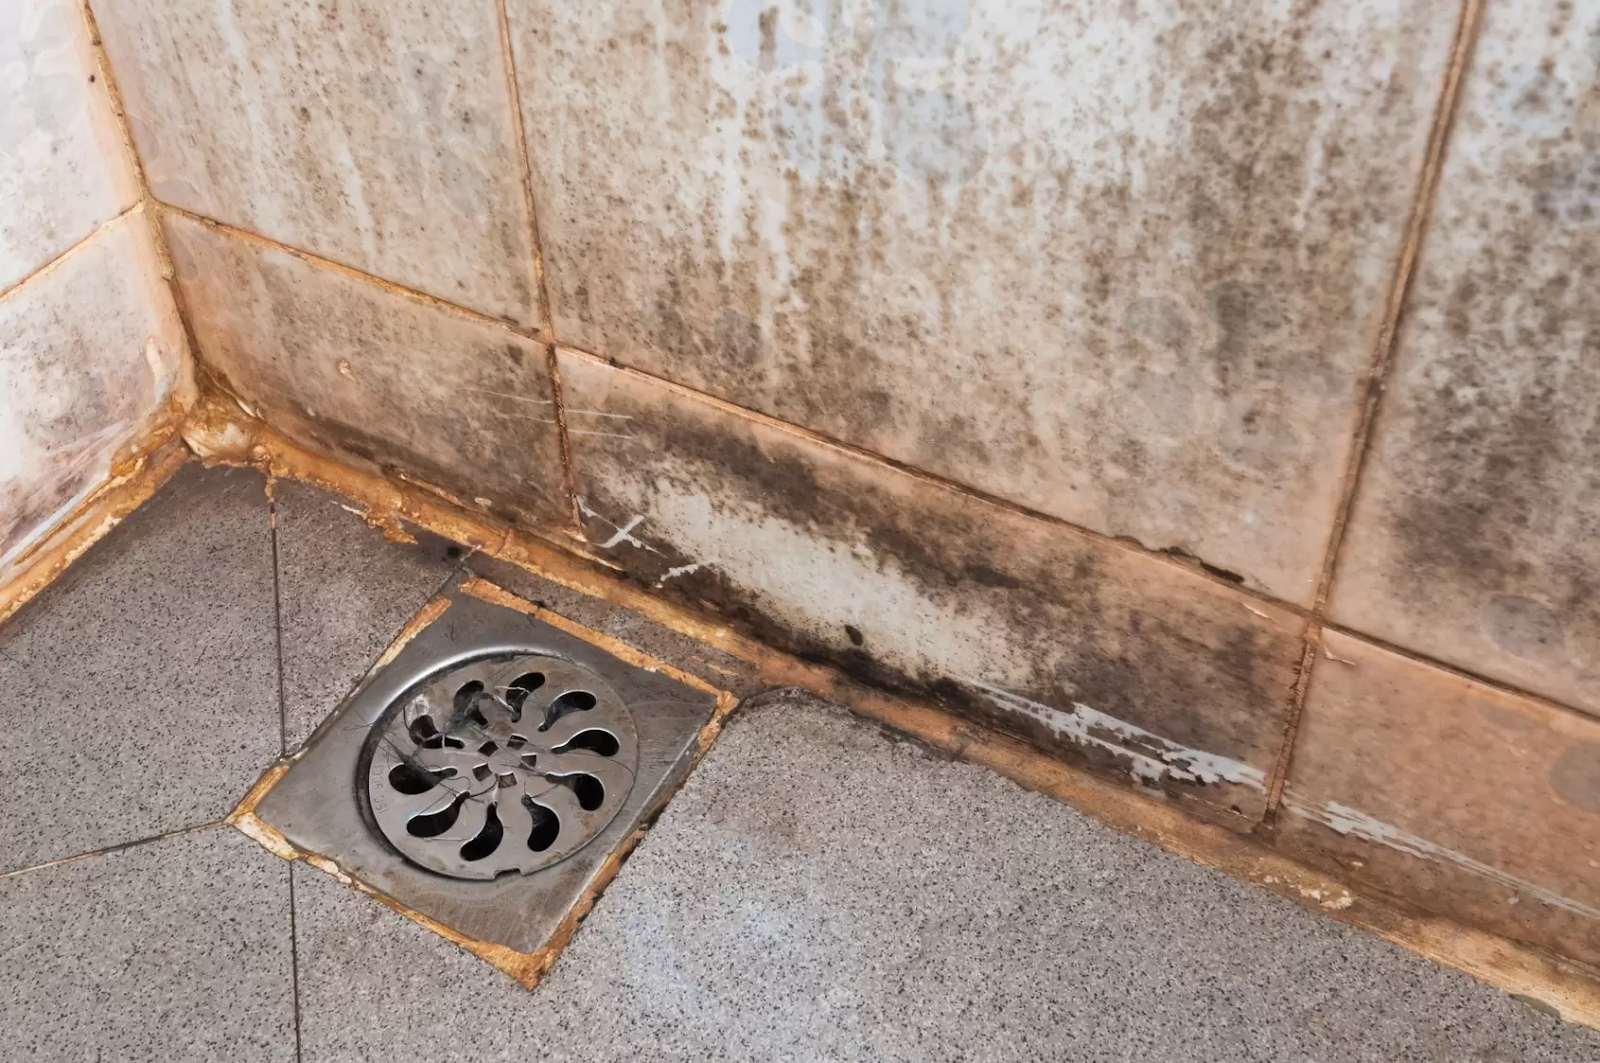
Discoloration
Mold often shows up as black, green, or brown spots or streaks on your shower caulk. If you notice these discolorations, it’s a strong sign that mold is present. This mold on shower caulk can be both unsightly and harmful, so it’s important to address it quickly.
Mold often shows up as black, green, or brown spots or streaks on your shower caulk. If you notice these discolorations, it’s a strong sign that mold is present. This mold on shower caulk can be both unsightly and harmful, so it’s important to address it quickly.
Musty Odor
A damp, musty smell in your bathroom is a clear indicator of mold growth. This odor can be quite unpleasant and is a common sign that mold is lurking, even if you can’t see it right away. The presence of this smell means it’s time for a thorough mold inspection to ensure your home stays healthy.
Fuzzy or Slimy Texture
Mold can appear with a fuzzy or slimy texture, depending on its type and growth stage. If you touch the caulk and feel a slimy or fuzzy texture, it’s a definite sign of mold. This texture change is often accompanied by visible discoloration, making it easier to identify mold on shower caulk.
Steps to Remove Mold on Shower Caulk
Once you’ve identified and diagnosed the mold issue, it’s time to take action. Here are the steps to remove mold on shower caulk effectively:
Prepare the Area
Start by opening windows or turning on exhaust fans to ensure proper ventilation. Wear protective gear, such as gloves, goggles, and a mask, to avoid inhaling mold spores and protect yourself during the cleaning process.
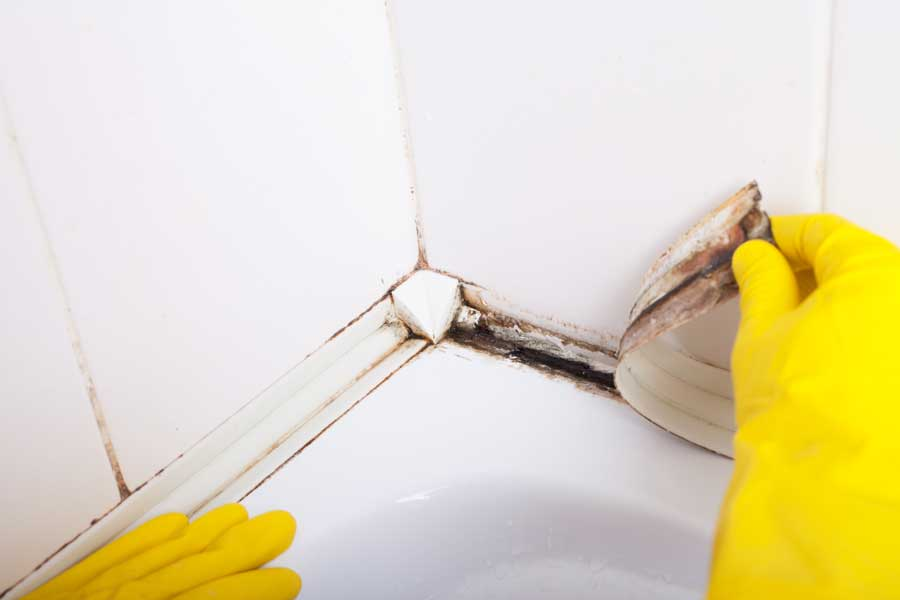
Remove Loose Caulk
Using a putty knife or a utility knife, carefully remove any loose or cracked caulk from the affected area. Dispose of the removed caulk in a sealed plastic bag to prevent spreading mold spores.
Clean the Area
Mix a solution of warm water and a mild detergent or bleach. Scrub the affected area with a stiff brush to remove any remaining mold and residue. Rinse thoroughly with clean water to ensure all cleaning agents and mold are washed away.
Apply a Mold-Killing Solution
After cleaning, apply a mold-killing solution specifically designed for bathrooms. Follow the manufacturer’s instructions for application and dwell time to ensure the solution effectively kills any remaining mold.
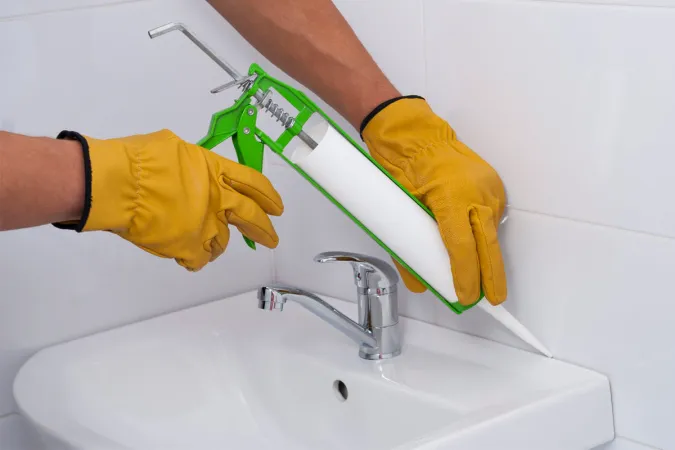
Re-Caulk
Once the area is completely dry, apply a fresh bead of caulk to seal the gap. Choose a high-quality, mold-resistant caulk for long-lasting protection. This step is crucial to prevent moisture from seeping in and causing future mold growth.
Maintain Proper Ventilation
Ensure your bathroom stays well-ventilated by running exhaust fans or opening windows both during and after showers. This helps to reduce moisture and prevent mold growth. Proper ventilation helps keep moisture levels low, preventing future mold growth on your shower caulk.
Preventing Mold Growth on Shower Caulk
While removing existing mold is crucial, preventing future growth is equally important. Here are some effective strategies to prevent mold on shower caulk:
Improve Ventilation
Proper ventilation is essential for controlling moisture levels in your bathroom. To keep your space dry, install or upgrade your exhaust fan to ensure it efficiently removes moisture during and after showers. Good ventilation helps prevent mold on shower caulk by reducing dampness.
Use Mold-Resistant Caulk
When re-caulking, opt for a high-quality, mold-resistant caulk specifically designed for bathroom use. These caulks contain antimicrobial agents that inhibit mold growth, helping to keep your shower caulk clean and mold-free for longer periods.
Maintain Cleanliness
Regularly clean your shower and caulk lines with a mild detergent or a diluted bleach solution. This routine cleaning prevents mold spores from taking hold and spreading, ensuring your bathroom remains a healthy environment.
Fix Water Leaks Promptly
Address any water leaks or moisture issues in your bathroom immediately. Prolonged exposure to moisture can lead to mold growth on caulk and other surfaces. Fixing leaks promptly helps maintain a mold-free bathroom.
Consider Mold-Resistant Surfaces
If you’re planning a bathroom renovation, consider using mold-resistant surfaces like tiles or solid surfaces. These materials are less prone to mold growth compared to porous materials, providing a more durable and mold-resistant bathroom environment.
Maintenance and Cleaning Tips for Shower Caulk
Regular maintenance and cleaning are essential to keep your shower caulk in good condition and prevent mold growth. Here are some helpful tips:
Weekly Cleaning
Wipe down your shower caulk with a mild detergent or a vinegar solution after every use. This helps to prevent soap scum and mildew buildup, keeping your caulk clean and mold-free.
Monthly Deep Cleaning
At least once a month, give your shower caulk a thorough cleaning. Use a stiff brush and a mold-killing solution to scrub away any stubborn stains or mildew. This deep cleaning helps to maintain a healthy and hygienic bathroom environment.
Inspect and Re-Caulk as Needed
Regularly inspect your shower caulk for any cracks, gaps, or signs of deterioration. If you notice any issues, re-caulk as necessary to maintain a proper seal and prevent moisture from seeping in. This helps to avoid mold growth on shower caulk.
Dry Thoroughly
After showering, make sure your shower area is completely dry. Use a squeegee or towel to remove excess water from surfaces, including the caulk lines. Keeping the area dry prevents mold from forming and spreading.
Consider Caulk Replacement
If your shower caulk is severely deteriorated or discolored, it might be time to remove and replace it entirely. Replacing old caulk can make a big difference in preventing mold growth and maintaining a clean shower. If needed, consult a professional to ensure the job is done right.
Natural Remedies for Removing Mold on Shower Caulk
If you prefer using natural and eco-friendly solutions, there are several effective remedies for removing mold on shower caulk:
Vinegar
Mix equal amounts of white vinegar and water in a spray bottle. Spray the solution onto the affected area and let it sit for an hour. After that, scrub the area thoroughly and rinse it clean. This simple solution can help eliminate mold on shower caulk effectively.
Baking Soda
To make a paste, blend baking soda with water until it reaches a thick, spreadable consistency. Apply the paste to the moldy areas and let it sit for a few hours. Then, scrub the area well and rinse it off. Baking soda is a natural and gentle way to tackle mold.
Tea Tree Oil
Tea tree oil has natural antifungal properties. Mix a little drop of tea tree oil with water in a spray bottle. Spray it onto the moldy caulk and let it sit for an hour. Afterward, scrub the area and rinse it clean. This method not only removes mold but also leaves a pleasant scent.
Hydrogen Peroxide
Apply undiluted hydrogen peroxide to the affected areas by spraying or pouring it on. Allow it to rest for a few hours to take full effect. Then, scrub the area and rinse thoroughly. Hydrogen peroxide is a powerful mold remover that can penetrate deep into the caulk.
Essential Oils
Certain essential oils, such as clove, lemon, and eucalyptus, have antifungal properties. In a spray bottle filled with water, add a few drops of your preferred essential oil to create a pleasant aroma. Spray the mixture onto the moldy areas and let it sit for a few hours to take full effect. After an hour, scrub and rinse the area. Essential oils not only help remove mold but also add a fresh, natural fragrance.
Professional Mold Removal Services for Shower Caulk
In some cases, particularly if the mold growth is severe or widespread, it may be necessary to seek professional mold removal services. Professionals have the expertise, equipment, and specialized products to effectively address mold issues, ensuring a thorough and safe removal process.
Here are some reasons why you might consider hiring a professional mold removal service:
Extensive Mold Growth
If mold has spread beyond the caulk and onto other surfaces, like tiles or walls, it’s time to call in professionals. They have the tools and expertise to handle widespread mold growth effectively.
Health Concerns
If anyone in your household has respiratory issues or a weakened immune system, it’s best to let professionals manage the mold removal. They can minimize health risks and ensure a thorough cleanup.
Structural Damage
When mold causes significant damage to surrounding materials, professionals can assess the extent of the damage and recommend appropriate remediation measures. This helps maintain the safety and security of your home.
Persistent Mold Issues
If you’ve tried various DIY methods but mold keeps coming back, it’s time to seek professional help. Experts can identify and address the underlying cause, providing a more permanent solution to your mold problem.
Mistakes to Avoid when Dealing with Mold on Shower Caulk
While addressing mold on shower caulk, it’s essential to avoid certain common mistakes that can exacerbate the problem or create new issues. Here are some potential challenges to be aware of:
Ignoring the Problem
Neglecting mold growth can lead to further spread and more severe consequences. Address the issue promptly to prevent escalation and keep your bathroom healthy.
Improper Ventilation
Failing to provide adequate ventilation during and after mold removal can cause mold spores to spread to other areas of the bathroom or home. Ensure good airflow to prevent this from happening.
Using Harsh Chemicals Improperly
While some chemical solutions can effectively remove mold, improper use or overexposure can be harmful to your health and damage surfaces. Use these products with care and always follow the provided instructions.
Incomplete Removal
Failing to remove all traces of mold and contaminated materials can lead to recurring growth and persistent issues. Make sure to thoroughly clean and remove all mold-affected areas.
Failing to Address the Underlying Cause
Simply removing the visible mold without addressing the root cause, such as moisture problems or poor ventilation, will likely result in the mold returning. Address the root causes to prevent future mold growth.
Attempting DIY Remediation for Severe Cases
In cases of extensive mold growth or structural damage, attempting DIY remediation can be ineffective and potentially dangerous. Seek professional assistance when necessary to ensure safe and effective mold removal.
Frequently Asked Questions
Can I use bleach to remove mold on the shower caulk?
While bleach can be effective in killing mold, it should be used with caution. Bleach can cause discoloration and damage to certain surfaces, and improper use can pose health risks. Always follow the manufacturer’s instructions and ensure proper ventilation when using bleach.
How do I prevent mold from returning after removal?
To prevent mold from recurring, address the underlying causes of moisture and dampness in your bathroom. Improve ventilation, fix any water leaks, and maintain proper cleaning and maintenance routines. Additionally, consider using mold-resistant caulk and surfaces during renovations.
Can I remove mold on the shower caulk while pregnant or with young children at home?
It’s generally recommended to avoid exposure to mold and harsh chemicals during pregnancy or when young children are present. Consider hiring professional mold removal services or having someone else handle the task to minimize health risks.
How often should I re-caulk my shower?
The frequency of re-caulking depends on the condition of the existing caulk and the level of moisture exposure. As a general guideline, it’s advisable to inspect and re-caulk your shower annually or whenever you notice cracks, gaps, or signs of deterioration.
Can mold on shower caulk cause structural damage?
Yes, if left unchecked, mold growth on shower caulk can potentially cause structural damage to the surrounding materials, such as tiles, grout, and even the underlying walls or floors. Addressing mold promptly is crucial to prevent costly repairs or renovations.
Conclusion
Taking care of mold on the shower caulk is essential for a healthy and attractive bathroom. Mold can be unsightly and harmful if not addressed. It thrives in the damp, warm environment of your shower, and if ignored, it can spread, causing more damage and potential health risks.
At Mold Testing Houston, we understand the importance of a mold-free home. Our team offers professional mold testing to identify any mold issues early. Plus, we provide a free mold inspection to help you stay proactive in maintaining your home’s health.
Don’t let mold take over your bathroom. With our expert solutions, you can ensure that your shower caulk remains clean and mold-free. We are dedicated to helping you create a safe and comfortable living environment.
Act now and take advantage of our free mold inspection service. It’s a simple step towards a healthier home. Contact Mold Testing Houston today and let us help you keep your bathroom mold-free with our comprehensive mold testing and removal services. Remember, a mold-free home is a happy and healthy home.
End Note
Dealing with mold on your shower caulk can be a real hassle, but you don’t have to face it alone. At Mold Testing Houston, we’re here to help you keep your home safe and mold-free. Our friendly team offers professional mold testing and removal services that you can rely on.
If you want to learn more about what we do, check out our website at Mold Testing Houston. We’ve got all the details you need about our services in Houston and Conroe. If you are curious about our story and dedication, visit our About page. For the latest tips and advice, don’t miss our blog.
Keep in touch with us on Facebook for ongoing updates and more valuable content. If you’re ready to take the next step, reach out to us for a free mold inspection. We’re here to help you create a healthier, mold-free home. Let’s tackle this together!