
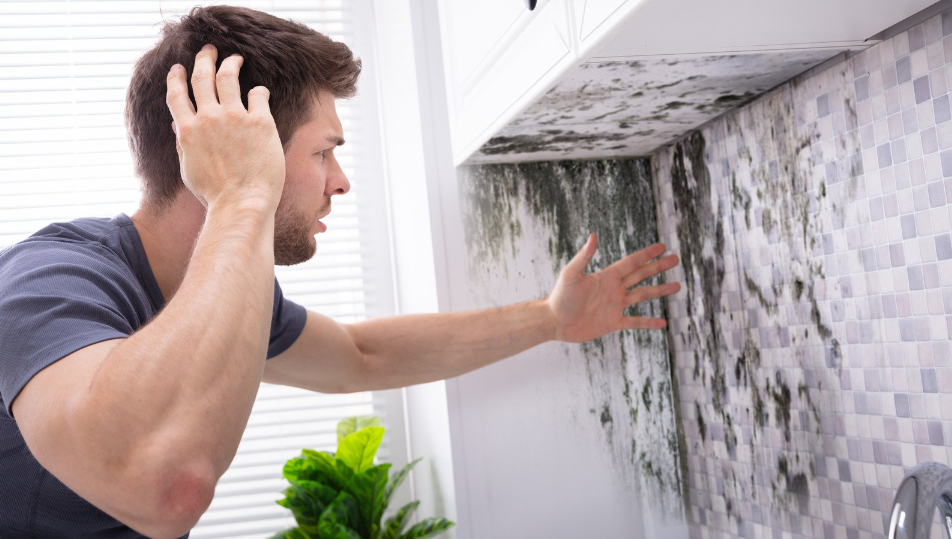
If you’re wondering how to clean mold off walls, you’re not alone. Many homeowners face the challenge of dealing with mold, which can be a stubborn and unsightly issue.
Beyond its unpleasant appearance, mold poses serious health risks and can cause significant damage to the structural integrity of your walls if left unchecked.
Addressing mold problems promptly is essential for maintaining a healthy living environment and preventing further deterioration of your home.
Understanding the proper techniques to remove mold safely and effectively is crucial. That’s why this guide is designed to provide you with a detailed, step-by-step approach to tackling mold on walls, accompanied by expert tips to enhance the effectiveness of your cleaning efforts.
Following our advice, you can ensure that mold is thoroughly removed and measures are taken to prevent its return. Stay tuned as we dive into the best practices for mold removal and maintenance to keep your home safe and clean.
Understanding Mold Growth on Walls
Mold is a type of fungus that thrives in moist environments and can spread rapidly under the right conditions. It reproduces through tiny spores that float through the air, which can start to grow on surfaces when they come into contact with moisture. This is particularly problematic in homes where water leaks, high humidity, or inadequate ventilation provide an ideal breeding ground for mold.
Common causes of mold on walls in homes include persistent humidity, condensation, water leaks from plumbing or exterior walls, and poor airflow. Rooms like bathrooms, kitchens, and basements are especially prone to mold growth due to their frequent exposure to moisture.

The health risks associated with mold exposure are significant and can affect everyone, especially those with allergies, asthma, or compromised immune systems. Mold exposure can lead to respiratory problems, allergic reactions, and in severe cases, more serious health conditions.
Therefore, understanding how to clean mold off walls effectively is not just about maintaining the aesthetics of your home but also about protecting the health of its inhabitants.
Preparing to Clean Mold Off Your Walls
Before you begin the process of removing mold from walls, it’s important to gather the right tools and materials to ensure the task is done safely and effectively. Here’s what you’ll need:
- Protective gloves: To avoid direct contact with mold and cleaning agents.
- N95 mask or respirator: To prevent inhalation of mold spores.
- Safety goggles: To protect your eyes from spores and splashes.
- Stiff-bristled brush: Useful for scrubbing mold off hard surfaces.
- Bucket: For mixing cleaning solutions.
- Spray bottle: For applying cleaning solutions to affected areas.
- White vinegar or bleach: Vinegar is a natural option that can kill most types of mold. Bleach is more aggressive and effective for severe mold problems but should be used with caution.
- Plastic garbage bags: For safe disposal of moldy materials.
Safety Precautions
When learning how to clean mold off walls, taking the right safety precautions is critical:
- Ensure adequate ventilation: Open windows and doors to keep the area well-ventilated.
- Wear protective gear: Always use gloves, masks, and goggles as mentioned above.
- Cover your skin: Wear long sleeves and pants to protect your skin from direct exposure to mold and cleaning agents.
When to Hire a Mold Removal Professional
While many mold problems can be tackled with DIY methods, there are situations when it’s advisable to call in a professional:
- Extensive mold growth: Professional removal is necessary if the mold covers an area larger than 10 square feet or inside the walls.
- HVAC involvement: If mold is in your heating, ventilation, or air conditioning systems, professional cleaners specializing in mold removal should address it.
- Health risks: If you have health conditions that make mold exposure dangerous, a professional mold remediation team has the equipment and techniques to remove it safely.
Deciding whether to clean mold yourself or hire a professional depends on the severity of the mold, the areas affected, and your personal ability to handle the cleanup without compromising your health.
Step-by-Step Guide to Removing Mold From Walls
Successfully removing mold from your walls involves a clear and systematic approach. Here’s a step-by-step guide on how to clean mold off walls, ensuring you address both the visible mold and its underlying causes.
Step 1: Inspection and Assessment of the Moldy Area
Before you start cleaning, carefully inspect the affected area to determine the extent of the mold growth. Look for any visible signs of moisture, which is a key contributor to mold development. Assessing the area helps in planning your cleaning strategy, especially in identifying if the mold is superficial or has penetrated deeper into the wall.
Step 2: Pre-Cleaning Actions
Address any underlying moisture issues before you begin the mold removal process. This could involve:
- Repairing any leaks in the plumbing or roof.
- Using dehumidifiers to reduce indoor humidity levels.
- Ensuring that the area is completely dry by using fans or opening windows helps prevent mold from returning.
Step 3: Choosing the Right Cleaning Solution
Select a cleaning solution based on the severity of the mold and the surface you are cleaning:
- For less severe mold or on delicate surfaces, use distilled white vinegar, which can kill most mold types.
- For more persistent or severe mold, a solution of bleach and water (one cup of bleach per gallon of water) may be necessary. Ensure the room is well-ventilated when using bleach.
Step 4: Detailed Steps for Cleaning Mold Off Walls
- Wear protective gear, including gloves, goggles, and an N95 mask.
- If using vinegar, spray it directly onto the moldy area, let it sit for an hour, then scrub it with a stiff brush.
- If using bleach, apply the mixture with a sponge or cloth, allow it to sit for 10 minutes, and then scrub.
- After scrubbing, clean the area with a damp cloth to remove any mold residue and leftover cleaning solution.
Step 5: Drying and Ventilating the Area Post-Cleanup
After cleaning, it’s crucial to dry the area thoroughly to prevent mold from returning. Use fans or dehumidifiers to speed up the drying process. Keep the area well-ventilated until it is completely dry. Regularly check the cleaned areas over the next few days to ensure that the mold does not return and that the area remains dry.
Following these steps will help you effectively remove mold from walls and take preventive measures to ensure it does not recur.
Preventing Future Mold Growth
Once you’ve dealt with a mold issue, it’s crucial to ensure it doesn’t come back. Here are practical steps and strategies for maintaining an environment that discourages mold growth. Focus on controlling humidity, enhancing ventilation, and adhering to regular cleaning routines.
Tips for Maintaining Proper Humidity Levels in Your Home
Keeping indoor humidity levels in check is essential for preventing mold growth. The ideal indoor humidity level should be between 30% and 50%. Here are some tips to achieve this:
- Use dehumidifiers: A dehumidifier can help maintain the desired humidity levels, especially in humid climates or during wet seasons.
- Monitor humidity levels: Hygrometers are inexpensive tools that measure indoor humidity. Regularly checking these levels can help you adjust your humidity control methods accordingly.
- Vent appliances that produce moisture: To prevent excess moisture buildup, make sure that clothes dryers, stoves, and kettles are vented outdoors.
Recommendations for Improving Ventilation in Moisture-Prone Areas
Proper ventilation is critical in areas of your home that are prone to moisture, such as bathrooms, kitchens, and basements:
- Install exhaust fans: Particularly in bathrooms and kitchens, exhaust fans can expel moisture directly outside, helping to prevent condensation that leads to mold growth.
- Open windows: Whenever weather permits, open windows to allow fresh air to circulate and reduce moisture levels.
- Use air circulators or fans: Enhancing air movement helps keep moisture from settling on surfaces, a key factor in mold prevention.
Regular Cleaning and Maintenance Routines to Prevent Mold Recurrence
Consistent cleaning and maintenance are your best defenses against mold returning:
- Inspect and clean regularly: Check areas susceptible to mold growth every few months. Wipe down surfaces and dry any signs of moisture, especially in the kitchen and bathroom.
- Fix leaks promptly: Leaks in roofing, plumbing, or windows can lead to significant mold problems. Repair these issues as soon as they’re discovered to prevent moisture from seeping into your walls and floors.
- Clean and dry thoroughly after incidents: If your home experiences flooding or water damage, it’s crucial to clean and dry the affected areas thoroughly within 24 to 48 hours to prevent mold from developing.
Implementing these strategies will help prevent mold and contribute to a healthier living environment. By controlling moisture, enhancing air quality, and maintaining clean surfaces, you can significantly reduce the likelihood of mold returning to your walls or other areas of your home.
Frequently Asked Questions
- Can vinegar kill mold off walls?
Yes, vinegar can kill most types of mold on non-porous surfaces due to its mild acidity. However, it may not be as effective on porous materials where mold can penetrate deeper. To use vinegar for mold removal, spray undiluted white vinegar on the moldy surface, let it sit for an hour, then wipe the area clean with water and dry thoroughly. This method is safe and non-toxic, making it a good choice for routine mold cleaning.
- Is bleach or vinegar better for killing mold on walls?
The effectiveness of bleach and vinegar in killing mold varies based on the situation. Bleach is highly effective at killing mold on non-porous surfaces because it kills surface mold as well as the underlying membrane, preventing growth. However, it does not penetrate porous surfaces effectively and can be harmful due to its fumes and potential to cause skin irritation.
Vinegar, while safer and non-toxic, might not always kill the underlying mold on porous materials. It’s better suited for regular maintenance rather than addressing severe mold problems. Overall, bleach should be used cautiously and only in well-ventilated areas, while vinegar is preferable for less severe cases and routine cleaning.
- How do I know if the mold on my walls is dangerous?
All molds should be treated as potential health risks, not just those typically classified as toxic, like black mold (Stachybotrys chartarum). If you see significant mold growth, or if it covers a large area (more than 10 square feet), it’s best to consider it potentially harmful.
Mold exposure can cause respiratory problems, allergic reactions, and other health issues. If you suspect the presence of extensive or dangerous mold, it’s advisable to contact a professional who can assess and safely remove it.
- Can I paint over the mold to cover it up?
Painting over mold is not recommended as it covers the problem without resolving it. The mold will continue to grow beneath the paint, potentially causing further damage to your walls and health risks. Before painting, you must completely remove the mold and ensure the surface is dry. Applying a mold-inhibiting primer can help prevent future growth, but only use this after the mold issue has been fully addressed.
Conclusion
Addressing mold issues promptly and effectively is essential for maintaining a healthy and safe living environment. By following the guide provided, you can take proactive steps to keep your home mold-free. With the right tools and knowledge, tackling mold issues can be a manageable task, ensuring that your living space remains comfortable and secure.
For those facing more severe mold challenges, seeking professional help is crucial. Mold Testing Houston offers specialized services tailored to identify and resolve mold problems. Their experienced team excels in protecting homes and businesses from the harmful effects of mold, providing services that range from mold inspection and testing to complete remediation. By focusing on early detection and prompt action, Mold Testing Houston helps prevent potential health issues and property damage, ensuring a thorough approach to mold removal.
If you suspect mold growth in your home or if you’re unsure how to handle an existing mold issue, don’t hesitate to contact Mold Testing Houston. Scheduling a mold inspection with professionals can significantly elevate your approach to mold management.
Mold Testing Houston is committed to delivering peace of mind through expert care, utilizing comprehensive strategies to treat mold issues effectively. By partnering with them, you ensure your home is not only treated for current mold problems but also safeguarded against future occurrences.
Protecting your health and property from mold is paramount. Take action today by consulting with Mold Testing Houston, where expert solutions meet personal care, ensuring your environment is safe and mold-free.


